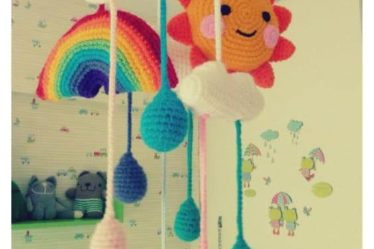
Your baby room is a small work to color a corner.
We share our best efforts to bring our children together with healthy toys so that their development is healthy.
You can do this work in different colors and color your room.
You can contact us in case of a short study recipe.
Terms;
St – stitch
Ch – chain stitch
Sc – single crochet
Dc – double crochet
Tr – triple crochet
Inc – increasing stitch
Dec – decreasing stitch
slst- slip stitch
R – round
HEAD:
- R1: 6St in magic ring (6)
- R2: Inc in every stich around (12)
- R3: (1 Sc – 1 Inc) x6 (18)
- R4: (2 Sc – 1 Inc) x6 (24)
- R5: (3 Sc – 1 Inc) x6 (30)
- R6: 1 St in every stitch around (30).
(Change to skin color) - R7 to 11: 1 sc in every stitch around (30)
- R12: (3 Sc – 1 dec) x6 (24)
- R13: (2 Sc – 1 dec) x6 (18)
- R14: (1 Sc – 1 dec) x6 (12)
- R15: 6 dec (6)
(Fill the head and close)
BODY;
- R1: 6St in magic ring (6)
- R2: Inc in every stitch around (12)
- R3: (1 Sc – 1 Inc) x6 (18)
- R4: (2 Sc – 1 Inc) x6 (24)
- R5: (3 Sc – 1 Inc) x6 (30)
- R6: 1 St in each stitch around (30)
- R7: work front loops only (2 St – 3 St) x 15
- R8: work in back loop of round 6; 1 sc in each stitch around (30)
- R9: 1 sc in each stitch around (30)
- R10: (3 Sc – 1 dec) x6 (24)
- R11-12: 1 sc in each stitch around
- R13: (2 sc – 1 dec) x6 (18)
- R14-15: 1 sc in each stich around
- R16: (1 sc – 1 dec) x6 (12)
- R17: 6 dec Fill and close
ARMS 2 adet;
Begin with skin color
- R1: 6sc in magic ring
- R2: 1 inc in each st around (12)
- R3: 1 sc in each st around (12)
Change to desired color - R4: 1 sc in each st around (12)
- R5: 6 dec (6)
- R6-8: 1 sc in each st around (6) Fill and close
TOP KNOT;
- R1: 6sc in magic ring (6)
- R2: 1 inc in each st around (12)
- R3: 1 sc in each st (12)
- R4: 6 dec (6)
Finish and sew to the head
WINGS (x4);
- R1: 10 Dc in magic ring in desired color
Change to white - R2: 1 sc in each st around (10)
- R3: 3 dc in each st around (30)
Sew 2 wings together facing their “wrong” side
FLOWER (x2);
With yellow
- R1: 6 sc in magic ring
- R2: 1 inc in each st around (12)
Change to orange - R3: (1sc – 1 inc) x6 (18)
Change to white - R4: 1 sc in each st (18)
- R5: (3 dc – 1 sl st) x 9. Finish.
Sew to pieces together with some filling between them, facing their “wrong” sides
LEAF;
Ch 14 loosely.
Sc in 3rd ch from hook, hdc in next ch, 2 dc in next 2 ch, 2 tr in next ch, 2dtr in next ch, 2 tr in next
ch, 2 dc in next 2 ch, hdc in next ch, sc in next ch, 2 sc in last ch.
Continue along the other side of the starting chain:
Sc in next sc, hdc in next ch, 2 dc in next 2 ch, 2 tr in next ch, 2dtr in next ch, 2 tr in next ch, 2 dc
in next 2 ch, hdc in next ch, sc in next ch, sl st to join.Fasten off.
RING;
- R1: 84 ch, join by one slst
- R2: (1sc – 1 inc) x 42 (126)
- R3 to 12: 1 sc in each st (126)
- R13: (1sc – 1dec) x 42 (84)
- R14: 1 sc in each st
- Join R1 and R14, fill while you are closing the ring.
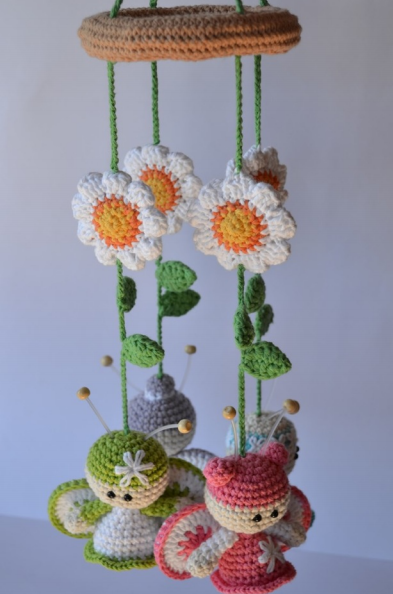
PUTTING TOGETHER
Sew head, body and arms as in the picture.
Join the pieces;
butterfly – 20ch
- leaf – 8ch
- leaf – 12 ch
- flower – 18 ch